Part 2: Deploying Distiled DeepSeek-R1 Models on Amazon SageMaker AI
Harnessing Open Source AI on AWS
Original Source of the blog post: Part 2: Deploying Distiled DeepSeek-R1 Models on Amazon SageMaker AI
Blog was written with my colleague from Loka: Crhistian Cardona
Building on our earlier exploration of deploying DeepSeek-R1 distilled models on AWS Bedrock, this post shifts our focus to another powerful service, AWS SageMaker AI. Whereas Bedrock excels at providing easy access to foundation models via API without needing infrastructure management, SageMaker AI is a fully managed machine learning platform that simplifies the end-to-end process of building, training, and deploying generative AI models.
By abstracting away the complexities of underlying infrastructure, SageMaker AI empowers developers and data scientists to concentrate on refining model performance, customizing training workflows and ensuring robust security and compliance.
In this post we’ll walk through the practical steps to deploy a smaller, distilled version of DeepSeek-R1 (or any other open-source model) on AWS SageMaker AI using traditional GPU-based instances, enabling scalable, production-ready inference.
The SageMaker AI Difference
SageMaker AI offers a comprehensive, fully managed platform that streamlines every stage of the machine learning lifecycle. It’s an ideal choice for deploying DeepSeek-R1 and other models that feature mixture‑of‑experts architecture and intensive reasoning capabilities that demand robust model parallelism, autoscaling and real‑time monitoring, all of which it provides right out of the box.
By taking care of the underlying infrastructure — including scalability, security and high availability — SageMaker AI allows engineers to focus on refining the model’s performance and customization. Its seamless integration with other AWS services, such as S3 for data storage, IAM for access control and CloudWatch for monitoring, simplifies both data management and operational oversight. Additionally, the platform supports a wide range of instance types and GPU configurations, enabling cost-effective, scalable deployments that can be quickly adapted to evolving workloads. SageMaker AI’s flexibility, coupled with AWS’s powerful tools for rapid prototyping and iterative development, ensure that GenAI applications are not only robust and secure but also optimized for production at scale.
Compare it to Azure ML, which excels with a no‑code designer for quick deployments, or Google Vertex AI, with its state-of-the-art TPU acceleration: SageMaker AI stands out by offering an extensive suite of built‑in algorithms, robust MLOps tools and seamless integration with the broader AWS ecosystem. This rich array of options not only supports diverse GenAI applications but also enables rapid prototyping and iterative development that optimizes production‑scale performance.
Prerequisites
Before getting started, ensure you have the following:
- AWS Account with permissions for SageMaker AI
- AWS CLI installed and configured.
- SageMaker AI Domain: Configure a SageMaker AI Domain if you plan to work within SageMaker AI Studio.
- Service Quotas: Verify that you have sufficient quotas (for example, instance counts for your chosen instance types) in your AWS account.
- IAM Role with access to SageMaker AI, S3 bucket
- uv, fast Python package manager
Architecture Overview
The deployment consists of three main steps:
- Downloading the model from Hugging Face (automatically handled by the Hugging Face Predictor)
- Create SageMaker AI Endpoint configuration.
- Deploy SageMaker AI Endpoint.
Architectural Diagram for Deployment of DeepSeek-R1 Distill Models (or Open-Source Models) on Amazon SageMaker AI
In this blog, we are going to cover one deployment method:
- Deployment via Code (with boto3, sagemaker sdk, huggingface)
- Deploy via Code (with boto3)
This method is a typical preferred method for ML or MLOps Engineers. The code can be found on this repository.
We have seven triggering process steps to trigger the Deployment via Code method.
Step 1: Set Up Environment Clone the repository and install dependencies:
1
2
3
git clone https://github.com/LokaHQ/deepseek-distilled-on-bedrock-custom.git
pip install uv
uv sync
Step 2: Configure AWS Credentials
1
aws configure
Or use AWS Vault for secure credential management:
1
aws-vault add <profile-name>
Step 3: Set Environment Variables
Create an .env file and update it with the necessary configurations:
1
2
3
4
5
6
7
hf_model_id = "deepseek-ai/DeepSeek-R1-Distill-Llama-8B"
role_arn = 'arn:aws:iam::[account_id]:role/service-role/[AmazonSageMaker-ExecutionRole-xxxxxxxxxxxxxxx]'
region_info = 'us-west-2'
instance_type = 'ml.g6.2xlarge'
initial_instance_count = 1
container_startup_health_check_timeout = 600
sm_num_gpus = 1
Step 4: Deploy Model Using Python Script
Run the deployment script:
1
2
3
4
5
6
7
8
uv run ./scripts/deploy.py \
    -hf_model_id <HF-MODEL-ID> \
    -role_arn <IAM-ROLE-ARN> \
    -region_info <AWS-REGION> \
    -instance_type <INSTANCE-TYPE> \
    -initial_instance_count <INSTANCE-COUNT> \
    -container_startup_health_check_timeout <TIMEOUT> \
    -sm_num_gpus <NUM-GPUS>
Step 5: Run Inference
Once deployed, you can run inference using the following script:
1
2
3
4
5
6
7
uv run ./scripts/inference.py \
    -endpoint_name <ENDPOINT-NAME> \
    -prompt "<PROMPT>" \
    -temperature <TEMPERATURE> \
    -max_new_tokens <MAX-NEW-TOKENS> \
    -top_k <TOP-K> \
    -top_p <TOP-P>
Step 6: Benchmarking the Model (Optional)
If you want to evaluate the deployed model by calculating some statistics about the costs and the latency you can execute the following script:
1
2
3
4
5
6
7
8
9
10
uv run ./benchmark/benchmark.py \
    -endpoint_name <ENDPOINT-NAME> \
    -region_info <AWS-REGION> \
    -output_dir <OUTPUT-DIR> \
    -temperature <TEMPERATURE> \
    -max_tokens <MAX-TOKENS> \
    -top_p <TOP-P> \
    -max_retries <MAX-RETRIES> \
    -cold_start_loops <COLD-START-LOOPS> \
    -stat_loops <STAT-LOOPS>
Step 7: Removing the Model
After you experiment with your model, it is advisable to remove it (delete it), by deleting the endpoint on which the model is hosted. You can do that by running the following script:
1
uv run ./scripts/delete.py - endpoint_name <ENDPOINT-NAME>
Best Practices
To ensure a smooth deployment and optimal performance of your DeepSeek-R1 model on SageMaker AI, consider these best practices:
- IAM Role Permissions: Make sure the IAM role has all necessary permissions for SageMaker AI, S3, and any other integrated services.
- Environment Variable Configuration: Double-check your .env file to ensure all parameters (like instance type and GPU count) match your resource availability.
- Endpoint Management: Always delete your endpoints when not in use to avoid unnecessary charges.
- Testing and Benchmarking: Run benchmarks to measure inference latency and throughput, and adjust parameters (such as temperature and max tokens) for your specific use-case.
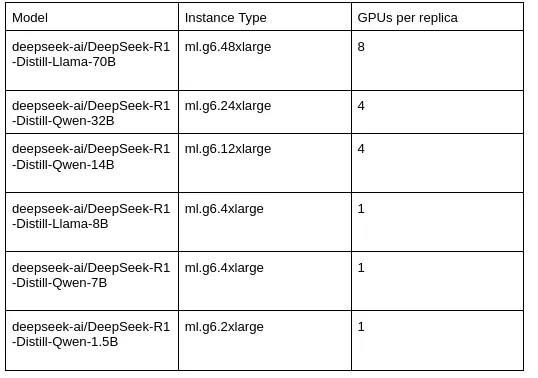
- Instance Selection: Choose the appropriate instance type based on the model size. Refer to the following table for guidance:
Looking ahead, our next blog post will explore how to deploy DeepSeek-R1 distilled models on raw EC2 instances using specialized Trainium or Inferentia chips, offering an alternative approach that emphasizes even greater cost efficiency and performance optimization in a more hands-on cloud infrastructure setup. And later in this series we’ll dive into cost and business considerations. Stay tuned!